You can create your KENEXOS® user account on your own initiative or you can respond to an invitation to work in a KENEXOS® system that you have received by e-mail. The creation of your user account is no different.
Proceed as follows to create your user account in both cases:
Open the KENEXOS® login page via https://app.kenexos.com, go to our company website https://kenexos.com/de and select the Login button at the top right or use the same button in our help section.
Click on “Register here”.
Please note the following information:
If you have already received an invitation to register as a user by e-mail, please be sure to use the e-mail address from your invitation!
Follow the steps shown below, which may differ depending on the type of registration and the respective accounts.
In the course of creating your user account, you will receive an e-mail for each of the options mentioned, with which you must confirm your user account, click on the corresponding link in this message, otherwise the creation of your account will not be completed.
2. login after successful registration
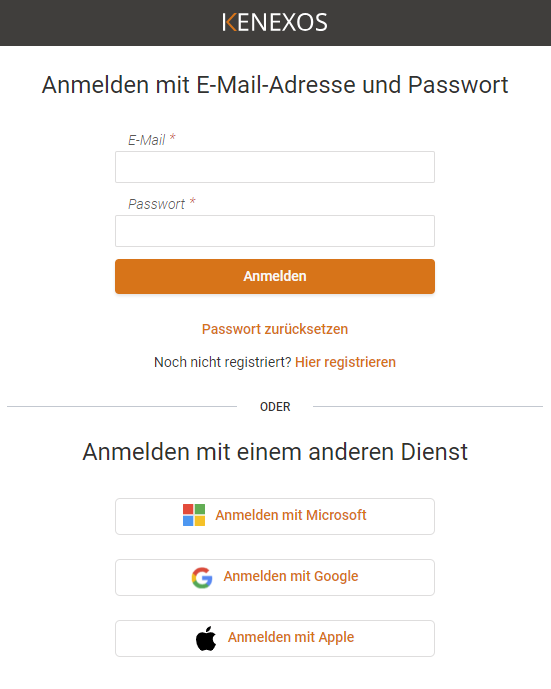
Open the KENEXOS® login page via https://app.kenexos.com, or go to our company website https://kenexos.com/de and select the Login button at the top right or use the same button in our help section.
Select one of the two options separated by a dividing line:
Login with e-mail address and password
Registration with a so-called “identity provider”, where you have the option of registering with your Google account Microsoft account or Apple account
to register.
Select the type of login you have already used to register your account.
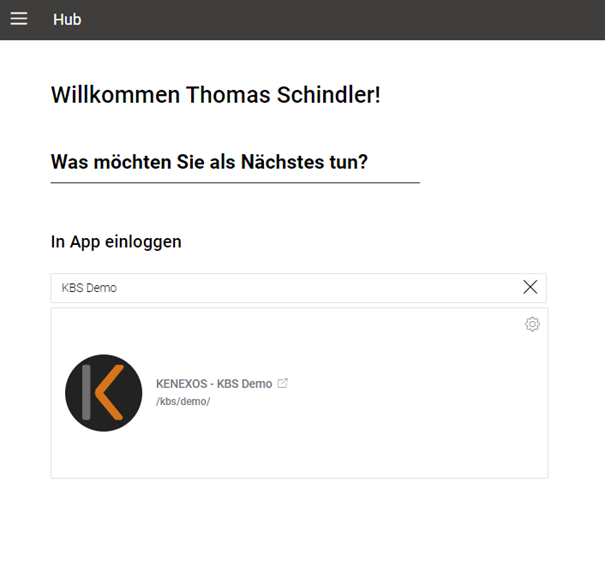
Start in the Application Hub
Once you have successfully logged in, you will find yourself in the so-called “Application Hub” where you can log into your KENEXOS® system.
3. my account
Personal data: First name, last name and account name/email are taken from your user account, first name and last name can be overwritten to correct any spelling mistakes. Your e-mail address is the unique identifier of your user account and therefore cannot be changed.
Settings: If necessary, select your desired language for your KENEXOS® system here. This setting only affects your user account, it is not a global setting for all users. You can also set a format for the date and time display.
Notification settings: Click on “Edit” in the “Notification settings” area and select the desired settings. All notifications are sent to the e-mail address of your personal data.
Immediate notification: You will be informed immediately by e-mail of any changes to tickets that you have created.
Daily summary: You will be informed about every change once a day at the set time by e-mail . Scope can be set in the selection list.
Information about due date (reminder): Adjustable with lead time in days, tickets see selection list below. The corresponding ticket list is sent automatically every day at 6 a.m., provided that tickets match the set filter.
Default settings: The “Ticket category” and “Ticket type” fields can be automatically pre-assigned using this setting. To do this, select the corresponding entry from the respective selection list. The setting is supported both in the web application and in the KENEXOS® mobile application. Please note that the setting must first be synchronized on your mobile device and will only take effect afterwards.
After logging into your KENEXOS® system, you can make your user-defined settings in “My account”.
You can access “My account” in the menu at the top right (recognizable by your initials).
4. forgotten password
Open the KENEXOS® login page via https://app.kenexos.com, go to our company website https://kenexos.com/de and select the Login button at the top right or use the same button in our help section.#
Click on “Reset password” and enter the e-mail address of your KENEXOS® user account. If an account is registered with this e-mail address, you will automatically receive an e-mail with instructions on how to reset your password. Please also check your spam folder.
After resetting your password, you can log in again on the login page mentioned above.
5. set language
KENEXOS® may not be displayed in the desired language after the first login.
To do this, you will find the language switch in your KENEXOS® system in the menu at the top right (recognizable by your initials) in the second menu item “Language”.
Select your desired language setting there, this will be transferred to your settings under “My account”.
6. the dashboard
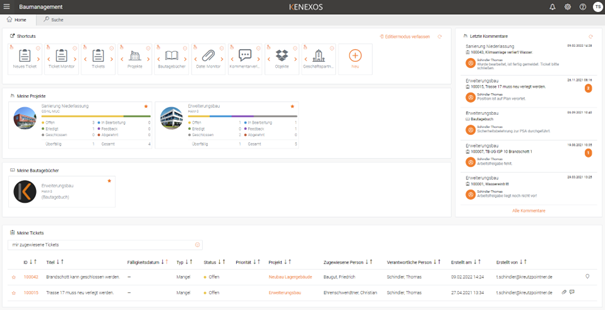
Shortcuts We provide so-called “shortcuts” for the most important and most frequently used work areas in KENEXOS® , which you can set up in your dashboard and arrange as you wish.
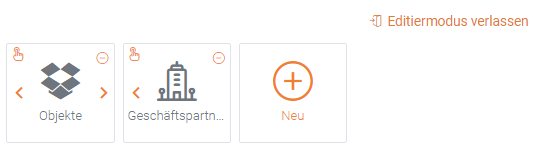
To arrange and, if necessary, extend your shortcuts, please select “Edit” in the corresponding section and you will see the display shown.
You now have the following options in edit mode:
Using drag & drop (click on the top left-hand corner of the corresponding symbol), you can swap the position of workspaces by moving an entry to another entry.
You can use the arrow buttons on the corresponding symbol to move the element one place to the right or left and arrange your shortcuts in this way.
You can add further shortcuts from the following selection by clicking on “New”. New elements are automatically added at the end and can then be arranged as described above.
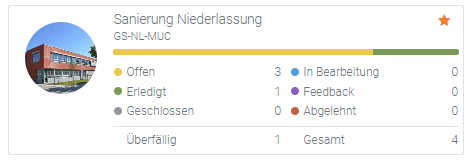
My projects If you are added to a project as a team member, the project is automatically displayed as a favorite in your dashboard. In the “Project” section in the “Projects” chapter, you will find additional information on manually adding projects to your dashboard.
The project display contains the following active elements:
Project name and abbreviation: Opens the corresponding project file or project overview
Tickets with project status: Click on the corresponding status to see the associated tickets in the ticket monitor
To remove the project from this view, please click on the star symbol and confirm the subsequent query with “Yes”
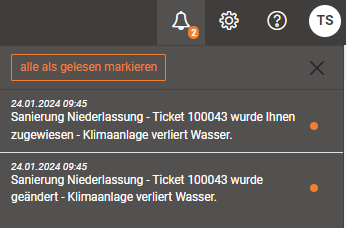
Last comments The “Last comments” overview informs you about the most recently entered comments and their associated entity. In the illustration shown, for example, two new, as yet unread comments have been entered for ticket 100015. A click on the corresponding line opens the comment history of the ticket, for example.
For a view of all stored comments, please click on “All comments”. You will be forwarded to the view of all recorded comments and can filter by project there (see chapter “Comment history”).
My tickets
“My tickets” serves as a quick overview of the tickets assigned to you, created or marked by you. The view is also actively designed, you can mark tickets there or switch to the ticket or project via the corresponding tickets. The symbols at the end of each line indicate whether files have been assigned to the corresponding ticket, comments have been added or an item has been marked on a plan.
7. notifications
The bell symbol informs you about changes to tickets that
were created by you
You have been assigned
belong to projects of which you are a team member.
You can recognize unread notifications by the orange marking on the right. Click on a notification to open the corresponding ticket.
All unread notifications are displayed without a time limit, read notifications are visible for 7 days.
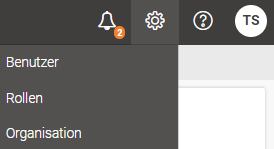
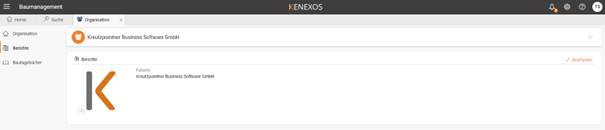
8. organization settings and logos
You can make organizational settings using the gear icon. This is central information that is used throughout your KENEXOS® system.
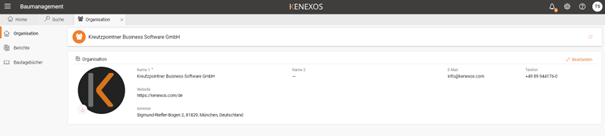
The data stored under “Organization” is used for the footer in e-mail notifications and indicates to the recipient that the notification originates from your KENEXOS® system. The company logo stored here is also displayed in the e-mail notifications.
A resolution of 400 x 200 px is sufficient for the logo.
A different logo and footer can be defined for reports in KENEXOS® (PDF documents). Please also note the recommended resolution of the logo of 400 x 200 px.
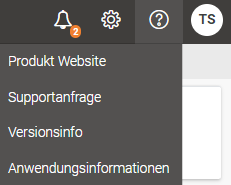
9. request help
Would you like to report a fault or – contrary to expectations – were unable to find a solution to your problem in our help section? Then you have the option of contacting our support staff directly from within KENEXOS®.
To do this, select the menu item “Support request”.
You will be redirected to our support page, for which a separate registration is required. After successful registration, customers will receive an e-mail confirmation in which they will also find instructions on how to use our support page.